Showing posts with label Terrain. Show all posts

28 May 2023

Hobby Block - To Be Continued

I’ve been in a funny old mood recently and I’m finding that it really takes a lot for me to get around to painting anything - I can think of about half a dozen different reasons for this, so it’s not too worrying or anything, but I must start to take steps to rectify it and find my love for painting little figures again soon!


I’m going to continue with these ponderings in a future post, but in the meantime here’s my most recent projects, including one I’m working on for the “rescue” challenge set by my mate Lewis (his blog will be in the side bar and I’ll link this later!). The idea is simple, find a mini that needs rescuing - strip the paint, rebuild it, hit it with the hairy brush and pigment! I started off overly ambitious, with the thought of doing the batch of minis I’ve most recently stripped - a little group of Mordian Iron Guard which will round out my collection to approximately a command squad and infantry squad. I’d suggested that I could potentially get them all done in the month, but then things got in the way:

  1. I can’t find the 12 other Mordians I have.
  2. I can’t find the Epic-scale Land Raiders I’d planned on using as the basis for a tracked support weapon for the Lascannon for the Command Squad (one of the ones from Lewis is the Lascannon operator, who had a separate Lascannon on wheels like a field gun, with his little button to fire the pewpew.
  3. Work has been busy (and I’ve been getting some other cool real-life stuff sorted out too!)
So, what to do? Mere days before the deadline!


There were a few other Necromunda minis that Lewis sent along too, donated by our friend Fraser. One of them got a mild conversion in order to join my Necromunda Slave Guilders - a bunch of gladiator-types and slave catchers (just the worst bunch of ingrates you’ve ever seen!). I dremeled away some of the old Goliath badges (which looked a bit Orky!) and severed his head - I repositioned this into a slightly more sensible pose (for a man with a chainsaw-mohawk…) and did some patching up with putty. I then decided that as he wasn’t really leader material (in my eyes) and he’d most likely just be a champion or what have you, I removed the barrel of the melta gun and replaced it with one from the Orlock upgrade sprue that matched in with some careful carving!


I started the rest of my gang with a metallic undercoat, so I went the same route with this guy - he’s now looked like this for a week, will I make the end-of-month deadline? Hell yeah!


Other stuff:

Megadroth Skeleton - a great kit from GW, I’ve always been a fan of the “omg that’s a huge skeleton!” terrain that we’ve seen in the 40K terrain collection (thinking of Space Wolves 3rd edition Codex, with terrain of some big Fenrisian beast’s skeletal remains!) and it’s nice to be able to buy one! Really nicely designed set without a lot of extra embellishment. I did do some slight changes though - I clipped away or dremeled off all the skulls and bones on the bases. 
- I filled any leftover holes with old greenstuff.
- Added gravel and sand to the areas that needed it with PVA. 
- When this was almost dry I took some PVA, watered it down and added a splash of washing-up liquid, thinly coated the parts I’d added gravel to. This step was to stop the gravel peeling away (I’ve had this happen on other terrain).
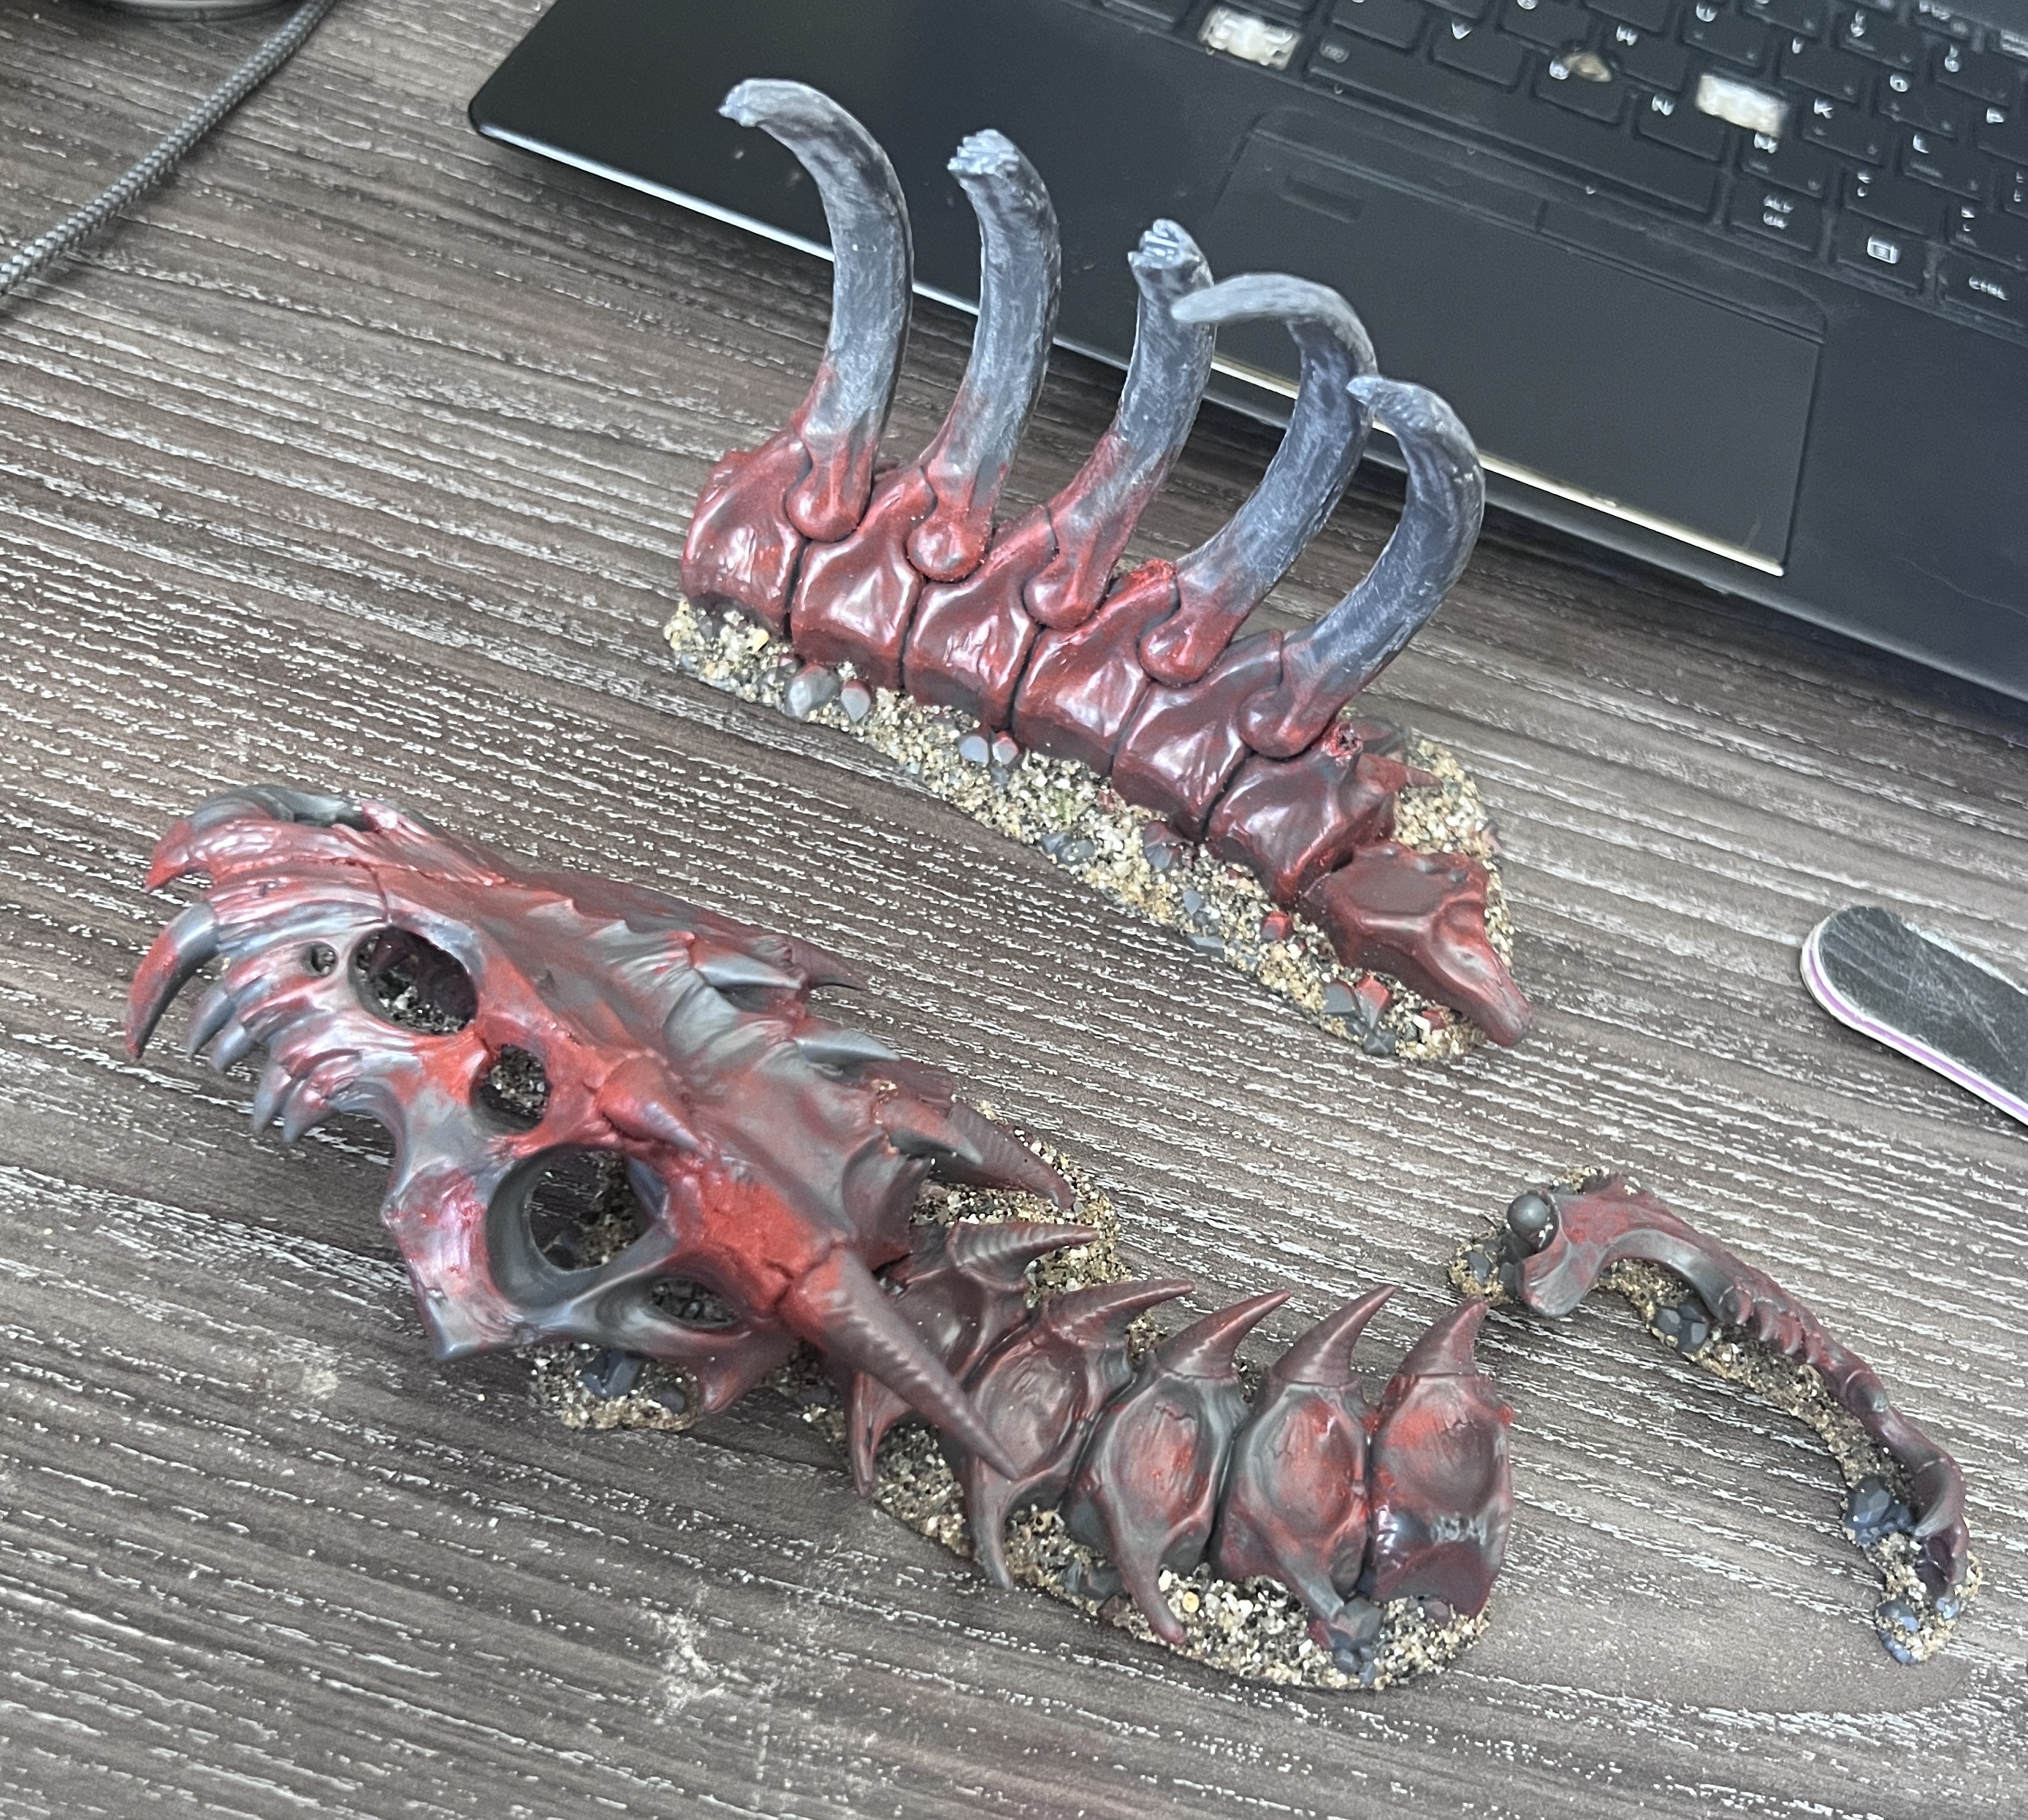

The reason for removing the skulls and bones isn’t because they weren’t nice and thematic, it’s just it would have directly tied it to the 28mm/32mm scale, but I wanted to keep it neutral and thus be able to use it at 6mm/10mm/15mm/28mm etc. (I know it’s themed around being in Ghur in the Mortal Realms, so the extra bones make sense there!).


Finally, I’ve also put together this squad of Necromunda Ironhead Prospector Squats. I’m currently pondering a scheme for them, but I’m thinking black/grey/yellowish-green like the Ryobi power tools. Call them the Riobi Consortium or something? They’ll likely be rather inep


Let me know what you think :) 

31 May 2021

Nodding Donkey Oil Derricks - TTCombat


These two are a terrain feature that’s been hanging around my desk for a few months now, always with the worry that one of the cats might scatter some of the sub-assemblies into the netherworld of the office floor...
This is an old kit from TTCombat and it shows - newer kits of theirs tend to fit together a lot smoother and get the details better (for example, anywhere you see connecting rods originally had square pegs to go in round holes...).
Even still, I’m really happy with the end result - two decent sized pieces of terrain that will fit in a few different theatres of battle!
Now this kit comes from the “Wild West” section of TTCombat’s brilliant MDF terrain, but that’s not quite right - I wondered when they were actually first used and apparently that’d be around 1925 and onwards. As such, they’ll likely not appear in any “normal” Wild West games I set up, but they might still sneak in to Dracula’s America games - I’d just headcanon it as some mad scientist having come up with them sooner in order to extract the sorcerous elements coveted by the factions in that game! 
They’ll also see use in the 1950s Man in the High Castle-themed American Resistance games I have planned as well as Gaslands, the post-apocalypse, the zombie-apocalypse and even Necromunda!

That’s 240 points!

20 May 2021

Dark and Dirty Dracula’s America Terrain

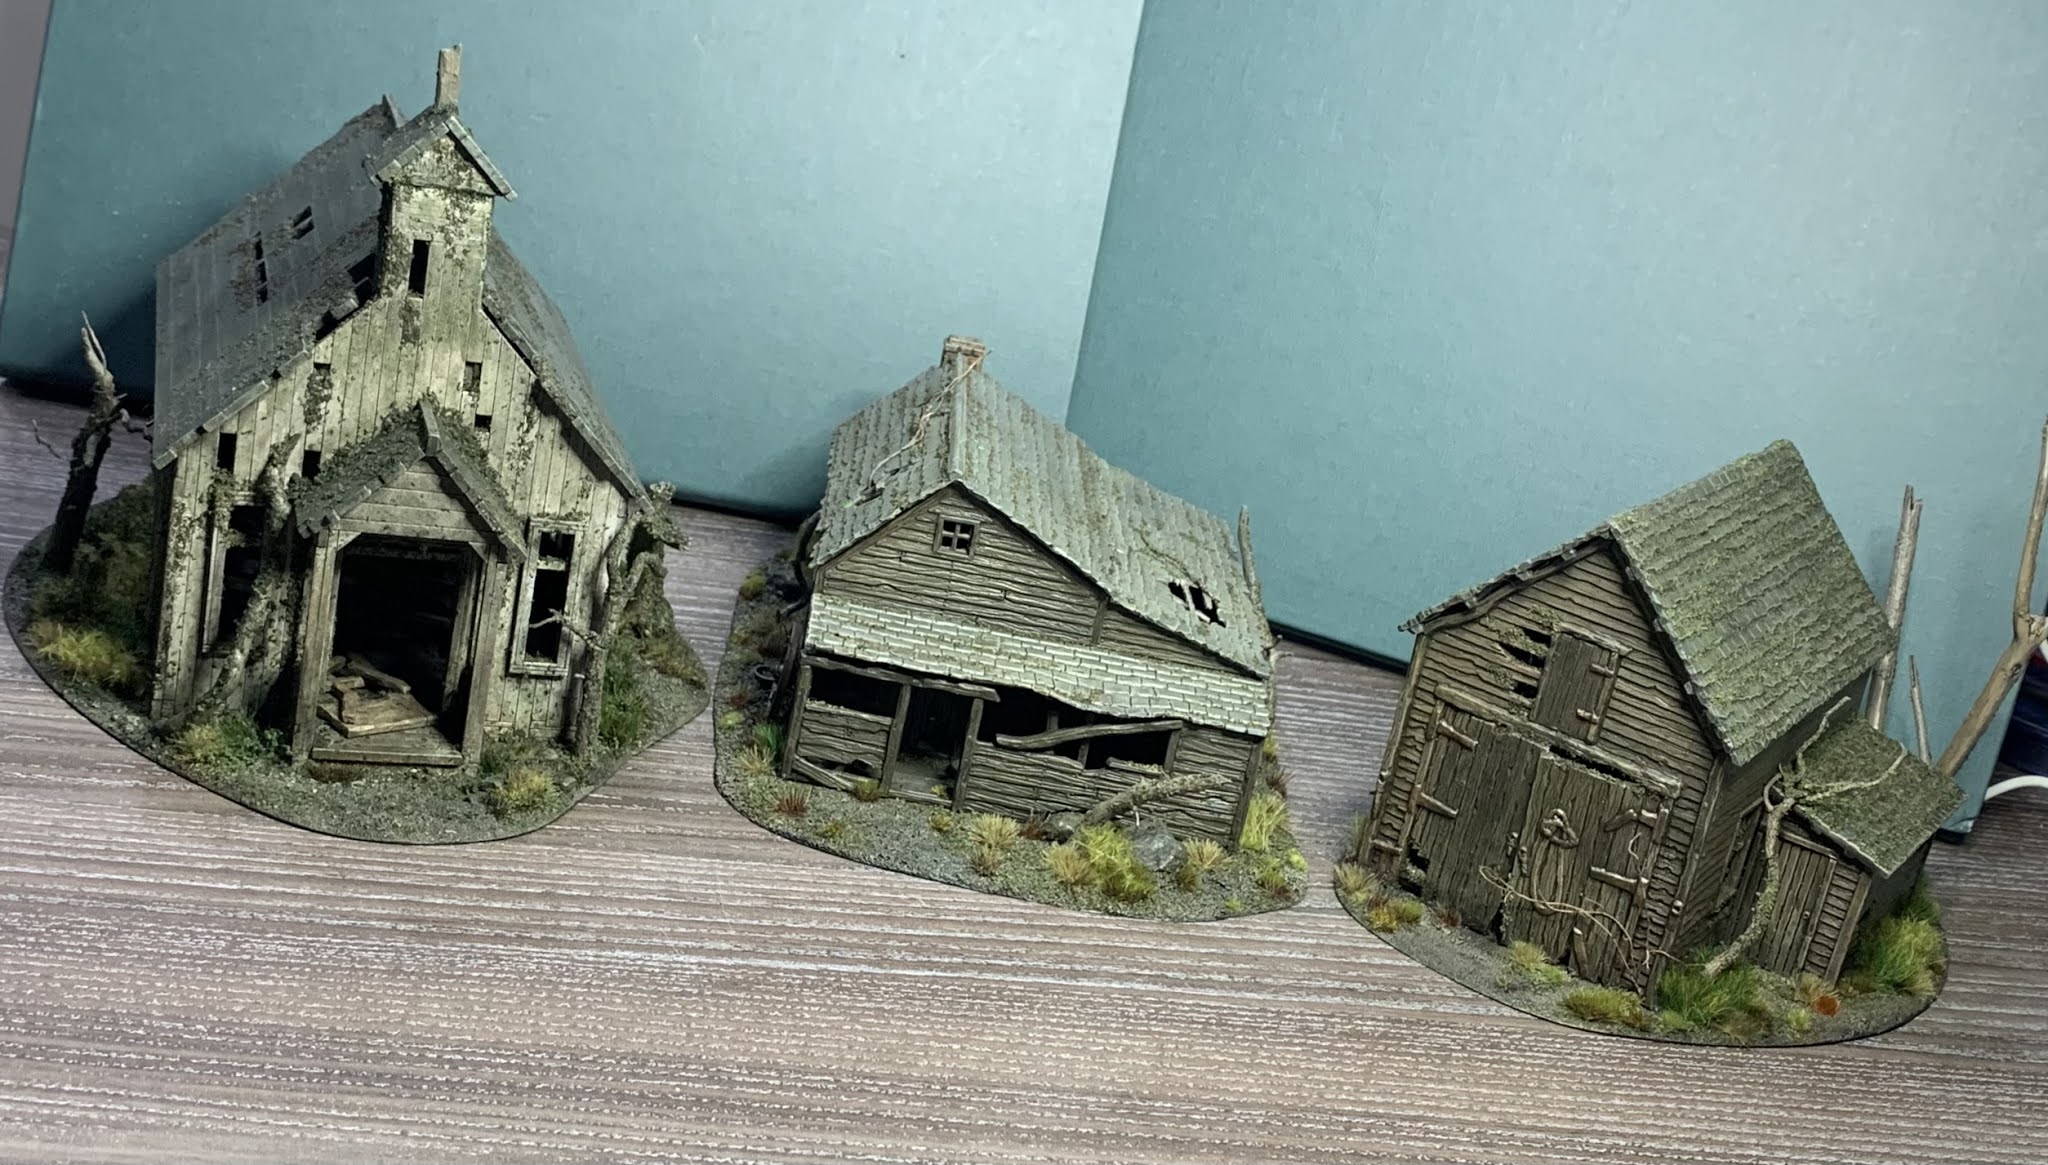
I loved the miniatures, art and setting of Dracula's America when it was first announced (back in August 2017) and hopped on the pre-order campaign, securing almost all of the starting warbands ("Posses" in in-game parlance) and the wonderful creatures! I've got a nice little chunk of it painted up and I had plans for a Louisiana-themed setting - swampy New Orleans gothic horror? Yes please! 

I started off by purchasing the Ghost Town Derelict Church from Sarissa Precision - a lovely American-themed church that had seen better days. I imagined this working either as part of an abandoned town or even surrounded by swampy terrain...

I also added to this a Perry Miniatures/Renedra Ramshackle Barn around the same time, with plans to scratchbuild some other similar farm buildings to complete the set - I got both of these buildings built, cut them MDF bases and added gravel and sand, undercoated them, basecoated them...then moved house several times. As you know, fellow hobbyist, life, uh, gets in the way...

After a few years I finally came back to this fledgling terrain collection early this year and around that time I discovered the Perry Miniatures/Renedra Ramshackle House which compliments the barn perfectly! One quick eBay purchase and a couple of days of building and painting and you have the set you see before you! I intend to write a separate blog post for each of the buildings as I'm really happy with how they've turned out!

How does that leave my HOBBY BINGO! board looking? After some discussion with Lewis we agreed that given that I mainly play skirmish games I could count the odd big monster I paint or a collection of terrain as a the Lord of War or Behemoth square - I think these fit that description nicely!

18 February 2021

The Throne of the Goblin King

Presenting the throne of the Goblin King! Or Ogre King, Ghoul Queen, Bugbear Emperor... You get the idea!

This is from the Escape from Goblin Town boxed set accompanying The Hobbit films - I realised the other day that I’ve bought almost all the components from the set apart from the dwarves and Gandalf! All in separate auctions or at wargaming shows (my last score was a bag of about 30 of the lovely (disgusting) goblins at the Vapnartak show in York a couple of years ago). I’ve also got the rickety platforms all painted up and a horde of the goblins that I believe I’ve shown previously on the blog!


What can I say about the terrain piece as it comes from Games Workshop? Mediocre? I can see why it was done that way but it certainly lacks something, hence why I added foam to bulk out the missing rear (see what I mean in the final picture (which is not mine and was found online for reference)) - the reverse of it is effectively just...not there! I used scraps of polystyrene glued together to form the rest of the rock outcrop, then carved it into shape and slathered over a mixture of PVA, a little sand and wall filler to create the texture of the rock. Once dry I worked out where the metal banding holding the (fancy formerly dwarven bed) to the rock would go and connect to the other side, which I then carved into the plaster mix and foam, to create the grooves for it to sit in. I made the banding with thin card, cut to size and then glued in place. I added rivets to this (pearls from a water filter) and then mounted it on a shaped piece of plasticard.


Painting this was a joy - I got so many colours in there for all the grime, mold, moss and algae and added patches of flock for the thicker areas of moss. It could of ended up a boring slab of grey rock, but these added life to the piece and set it nicely in a damp underground catacomb or pit. One thing I’d like to mention is the fact that this is also the King’s toilet - how grimy and glorious is that?! There is a bucket full of turds just underneath and a hole in the seat!


10 July 2015

Terrain - Renedra Wattle Fences

As part of the new terrain projects I decided that I needed some boundaries - he's the start of that with some wattle fencing.  
I did look into potentially making my own with cocktail sticks and some kind of wire, but given the amount of time that would have taken I opted to go for the Renedra plastic Wattle Fences set. The set arrives on sprue and takes a little bit of time to clean up with a sharp scalpel - it was the upright sticks in particular the were a little bit time consuming. Each fence length has the little base shown above, but I wanted to add something for a bit more stability.
The answer came in the form of tongue depressors - a pack of 100 was less than £2 including delivery from eBay. They're a bit flimsy, so I had to cut them down to shape with nail clippers. I have lots left over and they should be perfect for when I come to make some small stone walls or some barricades.
I cheated on the basecoating and used this Army Issue Spray Paint (Grey Brown) which I found half price in Boyes (a department store chain in the North of England - I get most of my paints here too, as they stock a decent range of Vallejo stuff plus some Games Workshop paints and figures).
Finally, here they are set up with some of my other recent terrain. 

Comments, suggestions, questions? All are welcome and thanks for reading!

08 July 2015

Terrain - Wargaming Mat

This was shown in an earlier post, but I figured it deserved a few more words.
With the need for new terrain came the need for a new mat - something a little bit healthier than my two Post-Apocalyptic playing areas. I found the wonderful tutorial at Tobi's Paint Pot and knew that it'd be perfect for my new gaming table! I gathered together the various materials as needed above.
I then followed the instructions, nailed my canvas to the wargames board so it wouldn't shrink when drying overnight, created the sludgy mix of paint, sand and acrylic paste and got to work! I created a road on it, for the perfect ambush setting, but in hindsight I think I may go back and re-do it as grass, which might be a bit more playable.
Finally, here's the table the next day once I'd had a chance to remove (and store away for the next project) the excess flock and trim the edges with a sharp pair of scissors. I like texture/variation that the various different types of flock (standard oldschool sawdust flock, static flock and even some oregano I happened to have an industrial amount of) has given it - I'd definitely use this method again! I'm wondering whether I could use the leftover material to make roads or paths.

Thanks for reading! Check out the link if it sounds of interest to you!

06 July 2015

Terrain - Rock Piles

Starting Historical (specifically Dark Age) gaming has made it necessary that I build a bunch of more standard terrain - the majority of my collection was decidedly post-apocalyptic! On the plus side, a lot of the new terrain collection can be used when gaming in many different periods and genres. Here's one of the first of my new projects, which was a test run to see how well the Making Wargaming Hills the 3T-Studios Way tutorial works - I'm very happy with the results and will be moving on to some much bigger hills! Go check it out if you like what you see! 


29 January 2015

Games Mat and completed Terrain


Huzzah! Terrain collection and games mat for historical gaming and perhaps more traditional fantasy all put together! I'm deliriously happy with this - everything here is brand new for January. The canvas gaming mat follows a great guide at Tobi's Paint Pot.

Things left to add:
- buildings - a number of Dark Ages houses and a pig sty to begin with - my plan eventually is to have enough buildings to play Song of Shadows and Dust but set in a Dark Age town
- more trees! I have another 5 bases of trees to complete at some point
- hills - I have the bases and foam, just awaiting the bark chips
- fences and walls

Phew! I also have around 25 Dark Ages villagers plus livestock assembled and undercoated to populate the settlement I plan to build and I want to put together some carts for the Vikings or Wildlings to ambush! Many plans! 


Here is my current SAGA Viking force making a shield wall on the new games mat and terrain.

25 January 2015

Terrain Idea...

I scavenged this skeleton from work recently - it's leftover from the Halloween decorations that were up. Rather than chucking it in the bin, I thought I'd see what I can do with it - my scavenger mind immediately went to terrain opportunities... I've washed it, which actually removed the glittery coating on it, and it's pretty much perfectly scaled to be the skeleton of a long-dead giant. I'll be cutting it up to be repositioned, finding some rocks for him to be slightly propped up by. It'll fit in with my fantasy terrain nicely!

Terrain - More stuff started!

My first wheat field using good old coir matting - I've already beveled and sanded the bases for another 3 of these - a really simple project to go along with a small Dark Age farmstead. Whilst I was on with the MDF bases for this I sorted out a bunch of small bases to make some rock likes from bark.

I bought a second-hand Garden of Morr kit back at the start of October - I decided to start cleaning it up tonight but decided to get rid of the silly amount of skulls on it. I love the GW terrain range, but they will insist on adding cartoony skulls to every empty spot. Inspired by sho3box, I'm going to remove all of the superfluous skulls of daftness. Some will just need removing, others will have paving sculpted in their place and some will be hidden by foliage. I'm looking to use this graveyard with lots of different genres - I'm happy enough with the gothicness, just not the cheese.


This will take a while.


24 January 2015

Terrain - Woodzzz

I'm very happy to have added the flock to these in a painkiller-addled haze! They're going to dry overnight and then get brushed off to remove loose flock, various washes to tie everything together, some tufts and maybes flowers to detail and then a final tidy up...

I'm ready for these to be done. Hah! Next up is a canvas games mat and then a Dark Ages building of some sort.

23 January 2015

Terrain - Woods - closer to completion...

Getting there! Everything is now drybrushed tan and stone grey, I'm about to unleash the PVA and flocks of various types!

I went back on the bases and added some rocks (out of woodchips) and some fallen logs (went into my garden and found some twigs) to give a bit more detail and stuff to work with when it comes to adding the detailing!

21 January 2015

Terrain - Woods Continued...

Got a decent amount done with the first half of the tree stands today - base edges beveled with sharp scalpel blades and sandpaper, sand and gravel added with PVA, excess brushed off once dried, made a few inserts with rocks (wood chips) and then undercoated all of the bare MDF and sand/gravel black...
Tomorrow will be about basecoating them Scorched Brown, drybrushing tan and stone grey, then the fun stuff - flock, leaf litter (dried oregano?!), fallen branches and logs etc. etc.
As mentioned in the earlier post, I have another 5 bases of these to do - with those I'll need to apply the foliage to the branches, so that'll be more work (to say the least!) and then I want to make more rock inserts, some with smaller scaled trees (which came with the other trees purchased from eBay) so I'll need to get some more of the MDF bases to insert in the larger terrain bases (thinking of stuff like Hordes of the Things here!).

19 January 2015

Terrain - Woods!

I purchased the materials for this terrain project a while back - I ended up buying over a hundred trees from a Chinese eBay store and the lasercut MDF bases from another eBay store. I also had a couple of bases of Woodland Scenics deciduous tree armatures based up as post-apoc terrain (for dead trees) that I decided to remove from the original bases and repurpose for this project - they will get clump foliage eventually!

Most of the trees from the Chinese store are great, but needed some clean-up before I could glue them to the individual bases - this is par for the course though, as the moldlines on the WS armatures were pretty bad to be honest!

Hopefully I'll get sand/gravel on these soon so I can start to sort them out - I have another 5 bases to go (I'm going for a full woodland board at some point!) and I'm itching to get them game-ready! There's also a lot of smaller trees/bushes leftover from the eBay order that I'll be buying more bases to get them based up, particularly for use with my 10mm Hordes of the Things games and 1/72 Lion Rampant Game of Thrones plans!

30 August 2014

Jungle Flora - Spikers

I built these alien plants a bunch of years ago, after collecting some pine cones in the woods of my home town. For years they'd languished in a tool drawer, until I rediscovered them and decided to tart them up...

To begin, I removed the spikes and their bases - they were originally on plastic 40k bases, but luckily I'd picked up some MDF bases at Vapnartak for this exact sort of thing! I glued the pine cones to the bases, then built up the rest of their bases with cork. I addd my usual sand and gravel, then took the cocktail sticks and whittled them somewhat to make them a little more natural. The spikes were then superglued in and the plants got a grey spray priming. I stuck pretty close to the original paint job I'd given them, which drew its inspiration from the classic 40k cacti (for which I bought some polystyrene ovoids back in March of this year...).

Let me know what you think of them in the comments below!

22 May 2014

It's been a while...

So, here's what I've been working on lately - all the pictures are from Instagram (link in the sidebar!) where I usually update daily (it's a lot easier to upload pictures and comment on them through my iPhone)...

Most of my Fantasy stuff is now based on the round Warmachine-style lipped bases - I hated the look of square-based minis fighting round-based minis, so I decided to go back and rebase my Mordheim mercenary warband!
I'm also a bit obsessed with weighting my bases - I've done it for years with the hollow-bottomed 40K bases, but I decided to start and do it with this sort too - I clip out the slottas, clean them up with a Dremel and add a 2p coin to the base. Adds stability and heft, especially good when it's a plastic mini!
This is where I'm currently upto - new bases, sand and gravel added, painted, static flock! I took the opportunity to make some slight changes here and there and I'll be going back over the figures to finish off the paintjobs (they were paintied about 6 years ago and could do with some highlights here and there. Also in this picture are my Hellboy/BPRD figures - they got rebased too and I'll be tarting up their paintjobs in due course...
I got this GW Skull Temple second-hand on Facebook, stripped off the paint and cleaned it up, then cut out some MDF to base it up on. I added sand and gravel around the sides...
...and then went over it all with a fine brush and some PVA, adding sand to the various cracks and crevices where it would of settled naturally. It's since been spray undercoated grey then given a light coat of black/brown to start. It'll be painted to fit the rest of my fantasy collection (cream-coloured stone with green washes for algae and the like).
I bought this cobra ornament at a car boot sale last year, thinking it might make a nice terrain piece.
I chopped out a MDF base to fit the bottom and added sand and gravel - I also cleaned up some parts of the statue with sandpaper (and removed the eyes before painting). Also shown is a recent conversion - a Dark Eldar Sslyth converted into a fantasy Snakeman - I'm going to use him as a vampire in Mordheim.
Finally, painting-in-progress. It's actually finished now, but I'll give the completed terrain piece a post of it's own!

So this is what I've been upto most recently - I have actually completed a bunch of other bits and pieces too, I just have yet to take some nice pictures of them! Let me know what you think of this stuff so far!